Test-Driven Development Based on Your Own Blockchain Creation Using Javascript
INTRODUCTION
The monetary transactions among the different entities are often validated and approved by a centralized third-party institution. For instance, the payment of bills or digital transfer of currency definitely demands either a bank or a payment gateway as a third party to accomplish the transaction (Nagasubramanian, 2020) Also, the banks or payment gateways charge transaction fees to the customer to complete the transaction. A similar scenario is extended to different online services, like online purchasing, ticket booking, online gaming, and music services.
In concise, the traditional transaction-based systems voluntarily involve a centralized third party to validate and approve the transactions besides two typical entities involved in the transaction. Contrastingly, blockchain is a technology that uses a decentralized peer-to-peer network to accomplish the transactions between participants without any centralized entity. It is continuously gaining momentum from both the academic communities as well as corporate sectors owing to its prominent features, which include auditability, immutability, decentralization and anonymity. It is a distributed ledger shared among all the nodes in the P2P network (Kumar and Gayathri 2016). Before adding any transactions into that shared ledger, each transaction is verified and validated by the consensus algorithm implemented in the nodes of peer-to-peer network. Upon successful verification, these validated transactions are bundled together and stored into the ledger as blocks, which are later chained together using the hashes of each block. So the blockchain is nothing but chaining of blocks where blocks are used to store the bundle of records/transactions. Each block contains (refer to Figure 10.1) hash code of that block, hash code of previous block, original data together with timestamp. Since each block is linked with each other by storing the hash value of its previous block, any attempt to modify a block leads to change in the hash value of that block which demands the update of hash value in the successive blocks till the end of the blockchain otherwise make that blockchain unusable which makes them more secure. Always, the head of the blockchain is named as genesis block. Genesis block is a dummy block, which contains random values to which the first transaction block points to and takes the hash of genesis block as last-hash in order to create a chain. Miners are specific group of nodes in the P2P network who do the job of validating and verifying the transactions using a unique consensus algorithm. Proof of work (PoW) is a kind of consensus algorithm by which the member nodes construct a trustworthy network atop of untrusted members. The newly generated transaction requests are broadcasted into this P2P network which is subsequently validated by miners thereby eliminating the presence of centralized control. Every block in the blockchain refers the preceding block’s hash value thereby ensuring the immutability of the blockchain. For instance, any adversary is trying to tamper the content inside any block leads to hash mismatches in the subsequent block since there is a mismatch between previous hash value field and hash of the modified block. Besides, the transactions are cryptographically sealed using public/private keys. This improvises the anonymity of the blockchain users since the original identity of its users still not traced by the miners. However, the blockchain technology poses the following technical challenges and limitations:

FIGURE 10.1 Representation of blockchain.
Latency: The blockchain technology takes approximately ten minutes to complete one dealing. This is due to the fact that it tries to improvise the security, thereby avoiding the double-spending attacks. In double-spending, a dishonest member is trying to successfully spend the same coin in two different transactions. The double-spending in Bitcoin can easily be identified by verifying and validating the input or consumed coins in a transaction is not spent in any of its previous transactions. Since the above-mentioned procedure is cumbersome and incurs lot of latencies in blockchain network, the modern day blockchain architecture expected to accomplish the new block creation and its verification in seconds without compromising the blockchain security.
Usability: Due to the practical difficulties in the present-day blockchain APIs while developing services, there is a need to propose a more sophisticated developer-friendly blockchain API.
Setting up the Environment
The first step in the development of developer-friendly blockchain API is to prepare the environment. To develop a blockchain project, open the command prompt in Windows 10 and create a directory named blockchain. Then create a directory named dev inside it, and create two files named blockchain.js and test.js as shown in Figure 10.2.
After that, execute the command npminit from blockchain folder to create a project. This operation demands several inputs from the user, just press the Enter key thereby accepting the default options as shown in Figure 10.3.
At the end of the npm command execution, a json file named package.json is created which is going to maintain out project and its dependencies. The knowledge about the javascript constructorfunction and prototype object is an elementary step to understand the structure of the blockchain. The constructor function is used

FIGURE 10.2 Blockchain project creation.

FIGURE 10.3 npm command execution.
to create objects, and it can be either a parameterized or non-parameterized one. The following code snippet is used to create a constructor for an Employee class thereby creating multiple Employee objects.
From Figure 10.4, it is evident that employed is an object of Employee class, which is having an ID of ID45, firstName of Smith, lastName of Jr and designation of Manager. Besides, the familiarity with Prototype object is also essential to understand the blockchain object. The Prototype object is a reference object that will be referred by several other objects to retrieve any information or functionality. Also, it is possible to extend the properties of the object using Prototype object. In Figure 10.5, it first prints out the default members of the Employee class; then the Prototype object is included from the Employee class. Subsequently, the Employee class object is extended with location attribute whose value is set as India. However, the extended feature is not reflected in the Employee class object. Then a getter method is designed to get back the values stored in the location attribute.
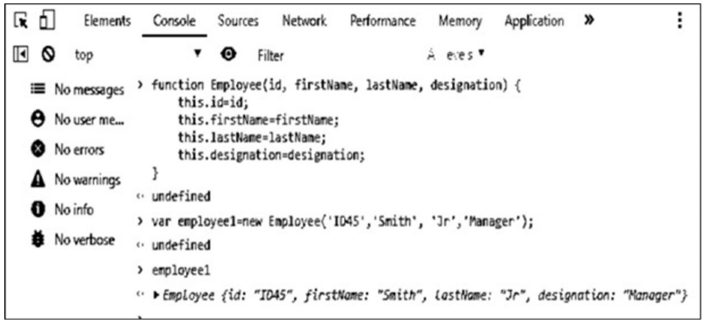
FIGURE 10.4 Employee class creation using employee constructor.


